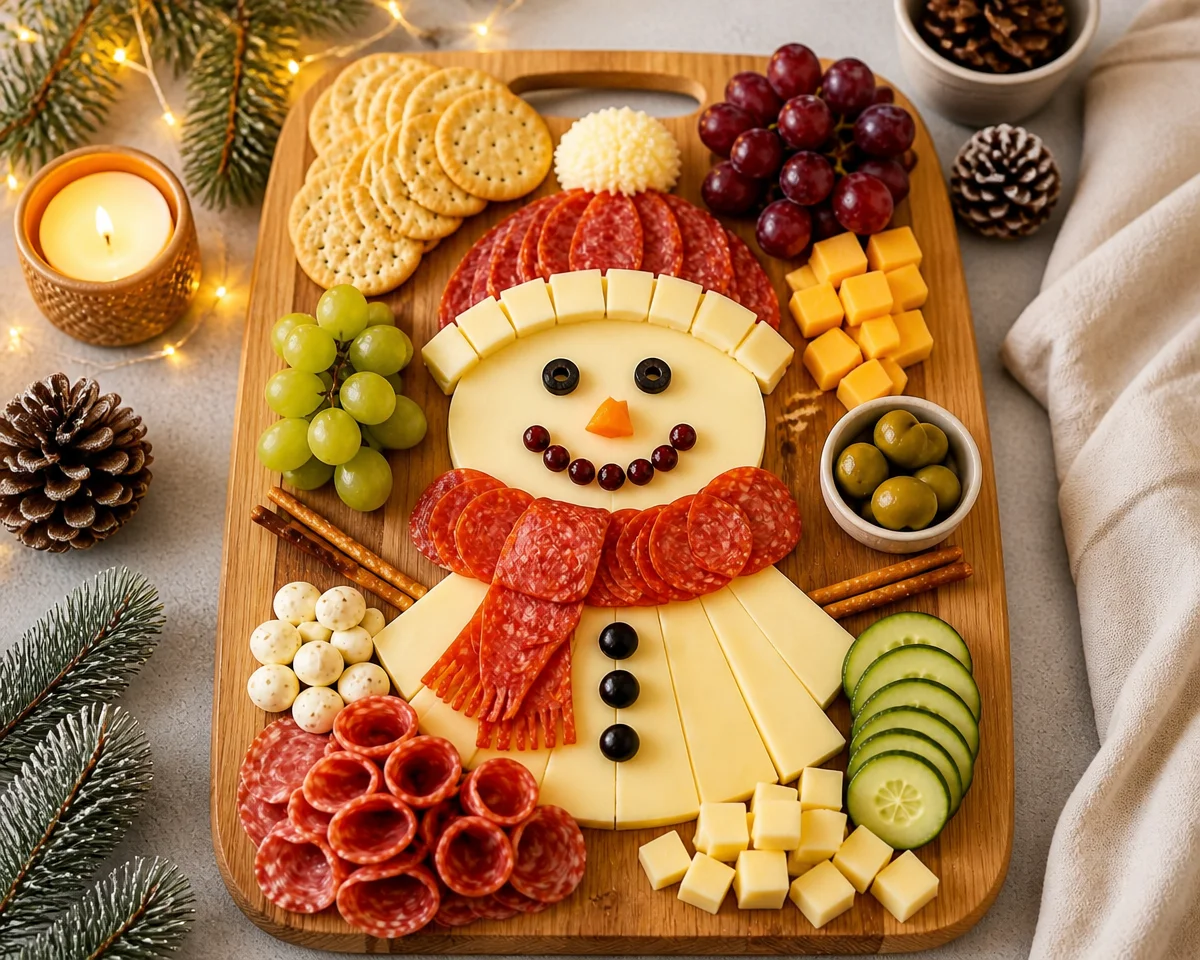
This Santa Claus Charcuterie Board turns simple meat, cheese, fruit, and crackers into a fun Christmas snack. Slices of ham make Santa’s face, salami forms his red hat, and mozzarella pearls create the white trim. Cheese wedges and strips give him fluffy hair and a full beard.
You do not need to cook anything for this recipe. You only need a clean board, a few basic tools, and time to arrange the food. It makes a cheerful centerpiece for a Christmas party, a family movie night, or a holiday lunch.
If you enjoy serving food this way, these breakfast charcuterie board ideas can also help you plan a simple spread for Christmas morning. This Santa board uses the same easy idea: arrange familiar foods so everyone can choose a few bites.
Why Make This Recipe
This Santa Claus Charcuterie Board looks festive without much work. The red salami, white cheese, and pink ham create a clear Santa face with no special molds or tools.
It also gives guests a good mix of flavors and textures. The meat tastes salty, the cheese adds a creamy bite, and the grapes bring sweetness. Crackers add crunch and give guests something to pair with the ham and cheese.
Here are a few reasons to make it:
- No cooking needed: You can build the whole board with ready-to-eat foods.
- Easy to adjust: Make a small face for a few people or a larger one for a party.
- Simple ingredients: Most grocery stores carry everything on the list.
- Fun to put together: Family members can help arrange the cheese and crackers.
- Easy to refill: Keep extra food cold and add small amounts as guests eat.
The design does not need to look perfect. A red hat, two dark eyes, a round nose, and a white beard will help guests see Santa right away.
How to Make Santa Claus Charcuterie Board
Start with a clean, food-safe rectangular wooden board. Use the long side from top to bottom so you have enough room for Santa’s hat, face, and beard.
Plan the shape before adding food. Leave the top part for the salami hat, the middle for the ham face, and the lower part for the cheese beard. Keep some space along the sides for grapes and crackers.
The amounts depend on the size of your board and how many people you want to serve. Start with a modest amount of each food, then add more to fill gaps. Keep extra meat and cheese in the fridge rather than placing everything out at once.
Ingredients
- Salami: Use thin, round slices that overlap easily to form Santa’s hat.
- Mozzarella pearls: Drain them well before using them for the white hat trim.
- Ham slices: Choose thin slices that you can fold into a rounded face.
- Black olives: Use pitted olives for Santa’s eyes.
- Cherry tomatoes: Use one for the nose and keep extras for serving.
- Cheese wedges: Choose a pale cheese for Santa’s hair.
- Cheese strips: Use white cheese strips to build the beard.
- Red grapes: Wash and dry them before placing them around the board.
- Crackers: Choose sturdy crackers that work well with meat and cheese.
A knife, small cutting board, paper towels, and serving tongs will help with prep and serving. If your wooden board is not suitable for direct food contact, use a food-safe platter instead.
Directions
-
Prepare the board and ingredients. Set your rectangular wooden board on a steady surface. Wash and dry the grapes and cherry tomatoes. Drain the mozzarella pearls and gently pat them dry. Cut the cheese into wedges and strips if needed.
-
Make the ham face. Fold and overlap the ham slices into a rounded shape near the center of the board. Keep the face wide enough to hold the eyes and nose, but leave room above and below it.
-
Add the eyes and nose. Cut a pitted black olive in half and place the halves cut-side down on the ham for eyes. Add a cherry tomato in the center for the nose. If it rolls, cut it in half and place one half cut-side down.
-
Build the salami hat. Arrange overlapping salami slices above the ham face. Make the bottom wide and narrow the slices toward the top to form a triangle. Curve the tip slightly to one side if you have room.
-
Add the mozzarella trim. Place a row of mozzarella pearls along the bottom edge of the salami hat. Add a small cluster at the tip to look like a white pom-pom.
-
Shape the hair and beard. Place cheese wedges along the sides of Santa’s face for hair. Stack overlapping cheese strips below the face to create a full beard. Taper the strips toward the bottom.
-
Fill the sides. Arrange small bunches of red grapes and groups of crackers around Santa. Leave the main face clear so the design stays easy to see.
-
Serve the board. Place it on the table just before guests are ready to eat. Add small tongs and plates nearby, then let everyone build their own snack.
How to Serve Santa Claus Charcuterie Board
Serve this board as a snack before a holiday meal or as part of a larger party spread. Place it where guests can reach both sides without leaning over the food.
Keep crackers near the edges so people can take them without disturbing Santa’s face. You can also serve extra crackers in a separate bowl. This helps them stay crisp and leaves more space for the design.
Use small tongs or serving forks for the meat, cheese, and fruit. Set out small plates and napkins so guests can gather a few bites at a time.
For a larger party, pair the centerpiece with individual charcuterie cups arranged in a tower so guests have another easy way to help themselves. The Santa board can stay at the center while the cups provide extra portions.
If young children will eat from the board, prepare their portions separately. Cut grapes and cherry tomatoes lengthwise into quarters, cut olives into small pieces, and cut cheese into age-appropriate pieces.
How to Store Santa Claus Charcuterie Board
Store leftover meat, cheese, and fruit in separate covered containers in the fridge. Keep the fridge at 40°F or below.
Put the crackers in a sealed container at room temperature. Do not store them with the ham, mozzarella, or fruit because moisture will make them soft.
Refrigerate perishable foods within two hours of setting them out. If the temperature is above 90°F, shorten that time to one hour. Discard perishable food that sits out longer than these limits.
For leftovers kept safely cold, aim to use the meat and cheese within three to four days, or sooner if the package directions require it. Count any time the packages were already open before you made the board. Fresh mozzarella may have a shorter storage window, so check its label.
You can assemble the meat and cheese portions a few hours ahead. Cover the board gently and keep it in the fridge. Add crackers just before serving. If the board does not fit in your fridge, prep the parts in separate containers and build it closer to serving time.
Tips to Make Santa Claus Charcuterie Board
- Dry the wet ingredients. Moisture from mozzarella, grapes, and tomatoes can soften crackers and make food slide.
- Build the main shapes first. Arrange the face, hat, and beard before adding small details.
- Overlap the meat. Slightly overlapping slices hide gaps and make each shape look more solid.
- Use pale cheese. White cheddar, Monterey Jack, or low-moisture mozzarella works well for the hair and beard.
- Keep the beard simple. Layer strips in the same general direction, then narrow the shape at the bottom.
- Check the face from above. This makes it easier to see whether the eyes and nose need to move.
- Avoid overcrowding. A little open space helps Santa’s shape stand out.
- Refill in small amounts. Keep backup meat and cheese cold until you need them.
If you plan to carry the board to another home, pack the loose eyes, nose, and crackers separately. Add those pieces after you arrive so the design stays neat.
Variations
You can change a few ingredients while keeping the same Santa shape.
For a milder board, use a mild salami and a mild white cheese. Avoid spicy meats if your guests prefer gentle flavors.
For a meat-free version, use red bell pepper strips for the hat and a layer of pale sliced cheese for the face. Keep the mozzarella trim, olive eyes, tomato nose, and cheese beard.
For a smaller gathering, build a compact Santa on a small platter. Serve extra crackers in a bowl rather than trying to fit them around the face.
You can also swap red grapes for green grapes or sliced apples. Add apple slices close to serving time to help limit browning. Whatever you choose, keep juicy fruit away from the crackers.
FAQs
Can I make this Santa Claus Charcuterie Board the night before?
You can wash the fruit, cut the cheese, and portion the meat the night before. Store everything separately in the fridge. Assemble the board closer to serving time for the best look and texture.
What cheese works best for Santa’s beard?
A firm white cheese that cuts into strips works well. Try white cheddar, Monterey Jack, or low-moisture mozzarella. Avoid very soft cheese because the strips may lose their shape.
How do I keep the mozzarella pearls from rolling?
Drain and dry them first. Place them close together against the lower edge of the salami hat. Small folds in the salami can help hold them in place.
Do I need a wooden board?
No. A large, flat serving platter or food-safe tray also works. Choose one with enough room for the hat above the face and the beard below it.
How much food should I buy?
For a light appetizer, plan roughly 2 to 3 ounces of combined meat and cheese per person, plus fruit and crackers. Offer more if the board will serve as a main part of the meal. The amount needed for the design will also depend on your board’s size.
Can I use pepperoni instead of salami?
Yes. Pepperoni gives the hat a similar red color, though it may taste stronger or spicier. Smaller slices may require more layering to fill the hat shape.
Conclusion
This Santa Claus Charcuterie Board makes a festive snack from simple foods. Build the ham face, add the salami hat and mozzarella trim, then finish with a cheese beard, grapes, and crackers. Keep the design simple and serve it fresh and cold.
For another holiday character idea, explore the Mrs. Claus holiday charcuterie board from Foodbites. You can also find more festive styling ideas in the easy Santa Christmas cheese board from hello, YUMMY.
Santa Claus Charcuterie Board
Ingredients
For the Santa Face
- 4 slices Thin slices of ham Choose thin slices that you can fold into a rounded shape.
- 1 piece Cherry tomato Use one for the nose and keep extras for serving.
- 1 piece Pitted black olives Cut in half to form the eyes.
For the Hat and Beard
- 8 slices Salami Use thin, round slices that overlap easily to form Santa’s hat.
- 1 cup Mozzarella pearls Drain them well before using them for the white hat trim.
- 4 pieces Cheese wedges Choose a pale cheese for Santa’s hair.
- 4 strips White cheese strips Use these to build the beard.
For the Board
- 1 cup Red grapes Wash and dry them before placing them around the board.
- 10 pieces Sturdy crackers Choose crackers that pair well with meat and cheese.
Instructions
Preparation
- Set your rectangular wooden board on a steady surface. Wash and dry the grapes and cherry tomatoes. Drain the mozzarella pearls and pat them dry.
- Cut the cheese into wedges and strips if needed.
Assembling the Face
- Fold the ham slices into a rounded shape near the center of the board for Santa's face.
- Place the olive halves on the ham for eyes and add a cherry tomato in the center for the nose.
Building the Hat
- Arrange the overlapping salami slices above the ham face to form a hat.
- Add a row of mozzarella pearls along the bottom edge of the salami hat.
Creating the Hair and Beard
- Place cheese wedges along the sides of Santa's face for hair.
- Stack overlapping cheese strips below the face to create a beard.
Finishing Touches
- Arrange small bunches of red grapes and groups of crackers around Santa on the board.
- Serve the board just before guests are ready to eat.