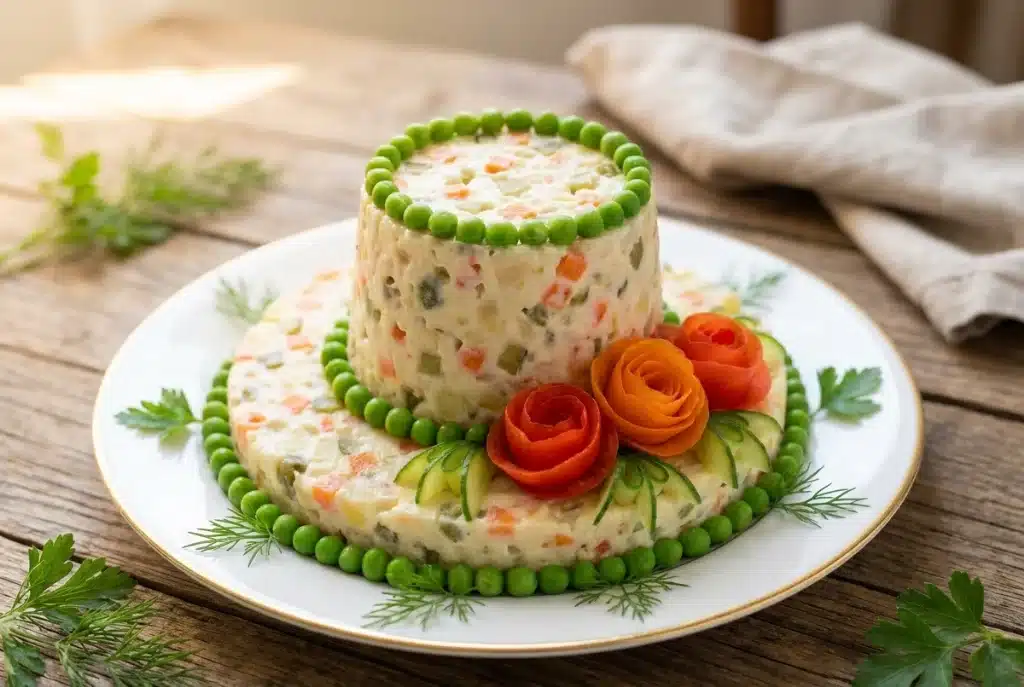
Every single time I bring a Hat Shaped Salad to a gathering, the whole room stops and stares. I’m not exaggerating. My daughter Léa literally grabbed my sleeve last Thanksgiving and whispered, “Mom, people are taking pictures of your salad.” And honestly? That’s exactly the reaction you want when you’ve spent time making something this special for the people you love.
This guide covers everything. The structure. The vegetables. The sneaky little tricks that stop it from collapsing right before your guests arrive. Whether you’re making this for a quiet Tuesday dinner or a full Thanksgiving table, I’ve got you.
The Only Hat Shaped Salad Guide You’ll Ever Need
I’ve seen a lot of “hat salad” attempts online. Some look incredible in photos but fall apart the second someone touches the serving plate. So I want to talk about the actual mechanics first, because once you understand why this works, the whole process clicks into place.
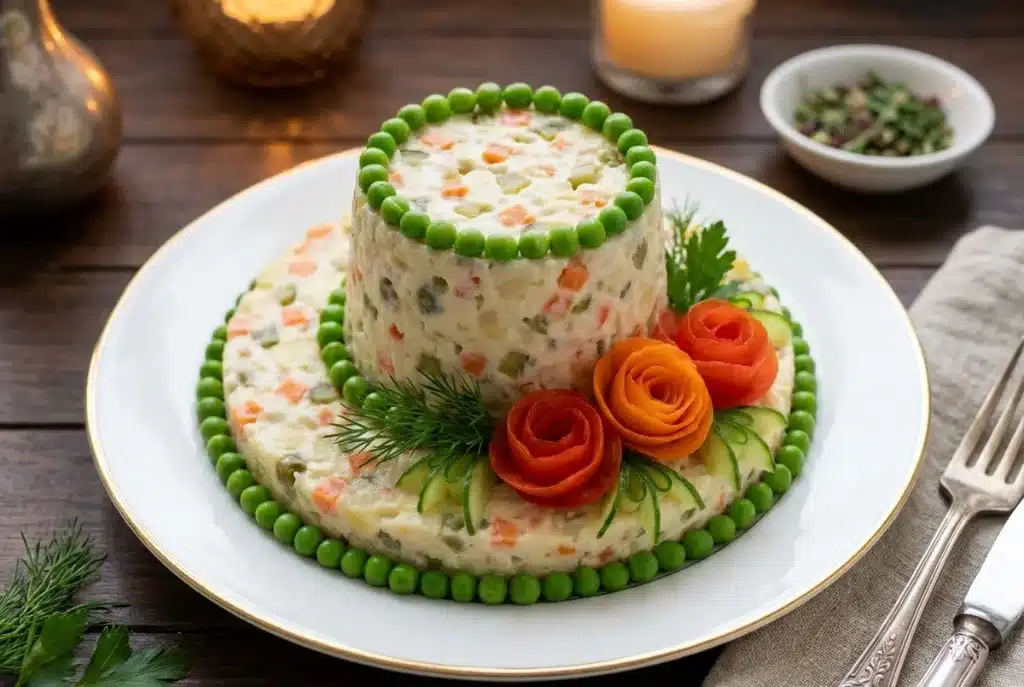
The Hat Shaped Salad is built on three distinct parts: the crown (the domed center mound), the brim (the flat, leafy edge that fans out around the base), and the garnish layer on top. Each part has a job. The crown holds the protein or main filling. The brim gives the hat its silhouette. And the garnish? That’s pure theater.
What Makes a Hat Shape Actually Hold Together on the Plate
The short answer is cold temperature and the right moisture ratio in your base. I learned this the hard way. The first time I made this salad, I used a beautiful chicken salad mixture that was just a little too wet, and when I unmolded it onto the plate, it slowly… spread. Like lava. Very embarrassing lava.
The base needs to be moist enough to bind but firm enough to hold a dome shape for at least two hours at the table. Think of the consistency of a well-made egg salad, where it holds its shape on a fork but isn’t dry or crumbly. Press it firmly into a round bowl, refrigerate it for at least 45 minutes, then invert it slowly onto your serving plate.
Use a rubber spatula to loosen the edges before unmolding. And place the serving plate directly on top of the bowl before flipping, so you have full control. It sounds fiddly, but after the first time, it feels completely natural.
Which Base Ingredient Gives the Crispest Hat Foundation
Honestly? My favorite base is a classic chicken salad made with rotisserie chicken, a little Greek yogurt, mayo, celery, and dijon mustard. It binds beautifully, slices cleanly, and has enough substance to support the layers going on top.
But tuna salad works just as well. So does egg salad. For a fully vegetarian version, a well-drained chickpea mixture with tahini and finely diced veggies is surprisingly sturdy. The key is draining any excess liquid before packing it into the mold. Extra moisture is the enemy of structure here.
For the brim, you want large, flat leaves. Romaine works perfectly. Butter lettuce is gorgeous but a little soft. Iceberg holds up longer, especially if you’re serving this outdoors or at a buffet where it might sit for a while.
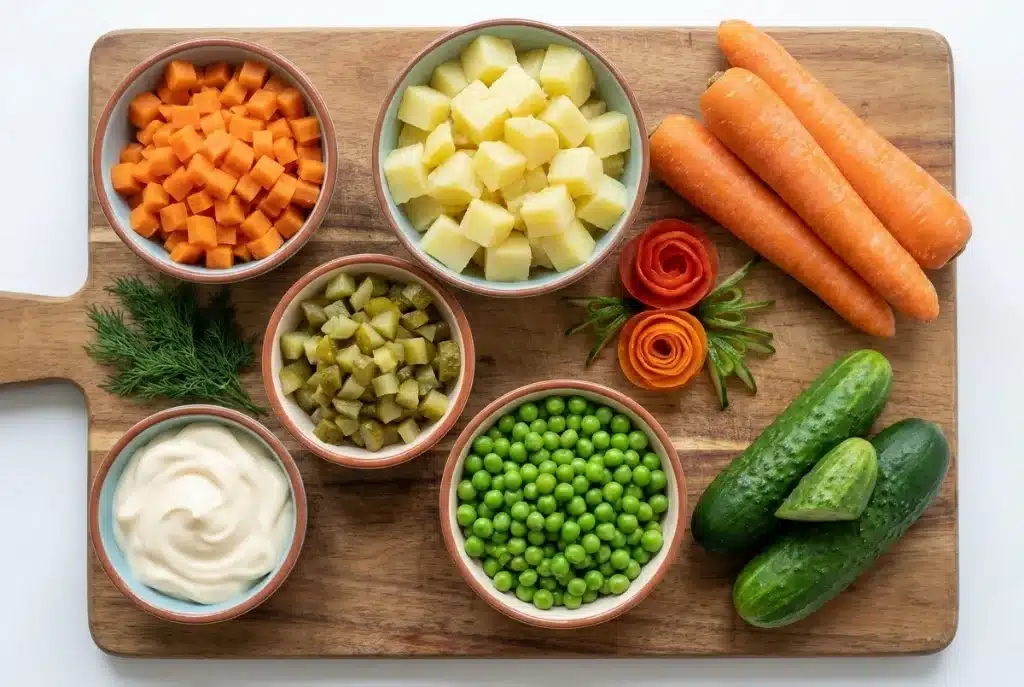
7 Vegetables That Build the Perfect Hat Shaped Salad
Color is everything with this salad. You want people to look at it and immediately feel like it’s a celebration. The best hat shaped salad ingredients are the ones that bring contrast, both in color and in texture, so every bite feels interesting.
Here’s my tried-and-true vegetable lineup that I’ve refined over probably two dozen versions of this dish:
| Vegetable | Role in the Salad | Prep Style |
|---|---|---|
| Shredded carrots | Color, sweetness, texture | Grate fine |
| Cherry tomatoes | Jewel-like garnish on brim | Halved |
| Mini cucumber | Crunch, freshness | Thin sliced rounds |
| Bell pepper (red, yellow) | Bright color band on crown | Fine dice |
| Radishes | Pop of pink, peppery bite | Thin sliced |
| Red onion | Flavor depth around brim | Very thin rings |
| Hard-boiled egg | Protein, creamy contrast | Sliced or quartered |
Which Vegetables Stack Without Collapsing Mid-Serve
This is the question I wish someone had answered for me years ago. Not every vegetable sits well on a curved dome. Anything round or slippery tends to roll off. Anything too heavy pulls down the sides.
The best stackers are finely shredded or diced vegetables that you can press gently into the surface. Shredded carrot, fine-diced bell pepper, and corn kernels all stick naturally to a slightly moist crown. Cucumber slices work beautifully around the lower edge of the dome where they can lean against the brim.
Cherry tomato halves, placed cut-side down, stay put much better than whole ones. And croutons? Absolute game changers for the very top of the crown. They add visual height and grip the surface perfectly. I use a sturdy wooden spoon handle to gently press each element into place, which sounds fussy but takes less than two minutes.
Can You Swap Core Ingredients for Dietary Restrictions
Absolutely, and this is one of the things I love most about the easy hat shaped salad recipe format. It’s endlessly adaptable. My sister-in-law Melissa is dairy-free, and I’ve made this completely without any cheese or mayo-based dressings for her, using avocado-lime dressing and a chickpea base instead. She loved it.
For gluten-free guests, skip the croutons and use toasted seeds (pepitas are beautiful) on the crown instead. For vegan versions, the chickpea or lentil base with a tahini-lemon binding works wonderfully. For kids who are picky about greens, you can use a finely shredded coleslaw mix as the brim instead of whole lettuce leaves. Still looks like a hat. Still gets the gasps.
The nutritional benefits of chickpeas in salads make them a particularly smart swap for the protein base, especially if you’re serving a crowd with mixed dietary needs.
Hat Shaped Salad for Parties: Crowd-Sized Versions That Wow
My husband James first suggested I make a full party version of this for our neighborhood Christmas potluck two years ago. I thought he was out of his mind. Doubling the recipe? For 30 people? But he was right. The hat shaped salad for parties is honestly one of the easiest large-format dishes you can make, because most of the work happens the day before.
For a crowd, use a large mixing bowl (about 4-quart size) as your mold for the crown. Line it with plastic wrap before packing in the filling, which makes unmolding about a thousand times easier. A round serving platter, at least 14 inches across, gives you enough room to fan out a generous brim.
How Far Ahead Can You Assemble a Hat Shaped Salad
Here’s the timeline I follow for parties, and it has never failed me:
- 2 days before: Make the base filling (chicken salad, egg salad, etc.) and refrigerate in an airtight container.
- 1 day before: Chop all vegetables, store in separate containers. Hard-boil eggs. Prepare any sauces or dressings.
- 2-4 hours before serving: Mold and unmold the crown onto the serving platter. Add brim lettuce. Loosely cover with plastic wrap and refrigerate.
- 30-45 minutes before serving: Add all vegetable garnishes, crown decorations, and dressing drizzle.
The greens should go on as close to serving time as possible. They’re beautiful for about two hours before they start looking sad. Plan accordingly, especially if you’re transporting this to someone else’s home.
Which Hat Shaped Salad Variations Suit Different Occasions Best
Not all parties call for the same version. Here’s how I adapt it by occasion:
Thanksgiving or Christmas: Chicken salad base with cranberry and pecan garnish. Deep green romaine brim. Pomegranate seeds on the crown for a festive, jeweled effect. This version is genuinely stunning on a holiday table.
Kids’ birthday parties: Use the hat shaped salad for kids by making the base with egg salad (crowd-pleasing and mild), a shredded coleslaw brim in bright colors, and fun toppings like corn, diced yellow bell pepper, and star-shaped cucumber cuts. The kids go absolutely wild for it.
Summer cookouts: A tuna base with a citrusy dressing, cucumber brim, and cherry tomato crown. Light, fresh, and holds up well at outdoor temperatures for about 90 minutes before needing to go back on ice.
Baby showers or bridal showers: The all-white version with chicken salad, endive or butter lettuce brim, white asparagus, and edible flowers on top. Breathtaking and completely elegant.
How Long Does It Actually Take to Build This Salad
I want to be real with you here, because a lot of recipes online dramatically underestimate prep time. The Hat Shaped Salad is not a five-minute dish. But it’s also nowhere near as complicated as it looks. The total time is about 45 minutes of active work, plus chilling time.
| Task | Active Time | Passive Time |
|---|---|---|
| Making the base filling | 15-20 min | 0 |
| Chopping vegetables | 10-15 min | 0 |
| Molding and chilling crown | 5 min | 45-60 min |
| Assembly and garnishing | 10-15 min | 0 |
| Total | ~45 min active | ~1 hour chill |
What Is the Fastest Easy Hat Shaped Salad Recipe Available
Perfect for those Tuesday nights when you have exactly 30 minutes and need something that still feels special. The shortcut version uses store-bought rotisserie chicken, pre-washed romaine hearts, and whatever colorful vegetables you have in the crisper drawer.
Shred the chicken, mix with 3 tablespoons of mayo, a squeeze of lemon, salt, and pepper. Pack it into a medium bowl lined with plastic wrap. Refrigerate for 20-30 minutes while you chop the vegetables and rinse the lettuce. That’s genuinely it for the base. Quick, simple, and still wildly impressive.
Which Steps Can Be Prepped the Night Before
Almost everything. The base filling keeps beautifully in the fridge for up to two days. All your chopped vegetables stay crisp in sealed containers for 24 hours. Hard-boiled eggs can be made up to a week ahead.
The only things I never do ahead are: placing the lettuce brim (do this 2 hours max before serving) and adding the dressing drizzle (literally right before it hits the table). Everything else? Night before, no problem. Morning-of prep makes the day-of assembly feel almost effortless.
Classic Hat Shaped Salad Recipe
Ingredients
- 3 cups shredded rotisserie chicken
- 1/3 cup mayonnaise
- 2 tablespoons plain Greek yogurt
- 1 tablespoon Dijon mustard
- 2 stalks celery (finely diced)
- 2 tablespoons fresh lemon juice
- Salt and black pepper to taste
Instructions
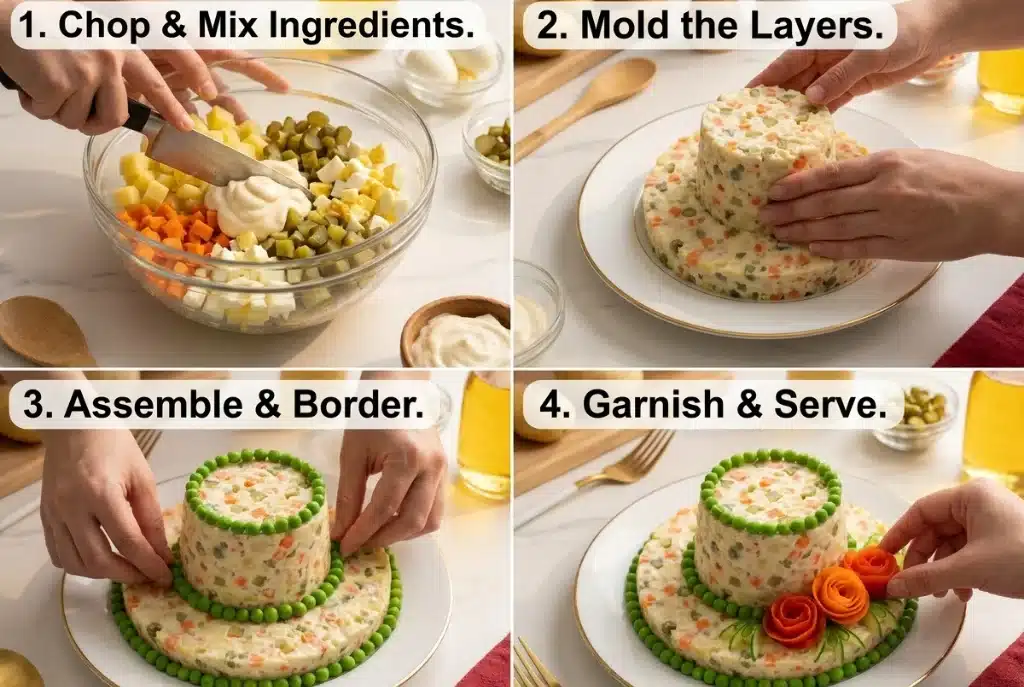
- Make the base filling: Combine shredded chicken, mayo, Greek yogurt, Dijon mustard, celery, and lemon juice in a large bowl. Season generously with salt and pepper. Mix until everything is evenly coated. Taste and adjust seasoning. The mixture should hold together when pressed but not feel wet or soupy.
- Mold the crown: Line a 6-cup mixing bowl with plastic wrap, leaving several inches of overhang on all sides. Pack the chicken salad firmly into the bowl, pressing it down with the back of a large spoon to eliminate any air pockets. Fold the plastic wrap over the top. Refrigerate for at least 45 minutes, or up to overnight.
- Prep your vegetables: While the crown chills, halve the cherry tomatoes, shred the carrots, slice the cucumber and radishes, dice the bell peppers, and quarter the hard-boiled eggs. Store each separately until ready to assemble.
- Prepare the serving platter: Choose a large round platter at least 12-14 inches across. This gives you room for a generous brim. Place it in the refrigerator to chill while you prepare the lettuce.
- Unmold the crown: Remove the bowl from the refrigerator. Place your chilled serving platter face-down directly on top of the bowl. Holding both firmly, flip them together in one confident motion. Lift the bowl away slowly. Peel off the plastic wrap. If the dome looks a little rough on the surface, smooth it gently with a damp rubber spatula.
- Build the brim: Fan the largest romaine leaves in a circular pattern around the base of the dome, tucking the stem ends under the crown so the leafy tips point outward. Overlap them slightly so no plate shows through. Scatter thin red onion rings over the brim.
- Layer the vegetables: Starting at the bottom edge of the dome and working upward, press shredded carrots around the lower third. Add a ring of cucumber slices above that. Then a band of diced bell peppers. Arrange radish slices and halved cherry tomatoes in the upper section of the crown. Place quartered eggs around the base of the brim for visual framing.
- Crown the top: Arrange croutons at the very peak of the dome. Tuck in a few sprigs of fresh dill or parsley for color. This is the moment where it really starts to look like a hat.
- Make and add dressing: Whisk together olive oil, apple cider vinegar, honey, and garlic powder in a small bowl. Season with salt and pepper. Drizzle lightly over the brim and vegetables right before serving. Don't drizzle it on too early or the lettuce will wilt.
- Serve immediately or refrigerate loosely covered with a tent of plastic wrap for up to 2 hours before serving. Bring to the table whole and let the reaction happen. It's worth every single step.
Notes
Always line your mold bowl with plastic wrap before packing the filling. It's the single biggest thing that makes unmolding clean and stress-free.
If your base filling feels too wet, stir in 2-3 tablespoons of plain breadcrumbs. They absorb excess moisture without changing the flavor.
Chill your serving platter before unmolding. A cold plate helps the dome hold its shape the moment it lands.
For a gluten-free crown, swap croutons for toasted pepitas or sunflower seeds. They look beautiful and grip the surface even better.
Assemble vegetable layers from bottom to top, always. Starting at the top and working down causes earlier layers to shift and slide.
Nutrition
- Always line your mold bowl with plastic wrap before packing the filling. It’s the single biggest thing that makes unmolding clean and stress-free.
- If your base filling feels too wet, stir in 2-3 tablespoons of plain breadcrumbs. They absorb excess moisture without changing the flavor.
- Chill your serving platter before unmolding. A cold plate helps the dome hold its shape the moment it lands.
- For a gluten-free crown, swap croutons for toasted pepitas or sunflower seeds. They look beautiful and grip the surface even better.
- Assemble vegetable layers from bottom to top, always. Starting at the top and working down causes earlier layers to shift and slide.
The Structural Secret That Stops Your Hat Salad Falling Apart
Okay, so this is the section I really wanted to write. Because every single hat shaped salad tutorial I’ve seen online glosses over the structural part. They show you a beautiful finished product and skip the part where it almost fell apart three times during testing.
Structure comes from two things working together: the right internal moisture ratio in the base, and strategic chilling at key moments. Get both right, and your salad stays picture-perfect from fridge to table. Miss either one, and you’re patching a collapsing dome with a spatula while your guests pretend not to notice.
What Hidden Binding Trick Do Party Chefs Never Share
Here’s what I discovered after my third collapsed version: a thin layer of cream cheese pressed onto the outside surface of the unmolded dome acts as a structural glue for the vegetable layers. Just a tablespoon or two, softened and spread very thinly with a small offset spatula or the back of a spoon.
It barely affects the flavor. But those shredded carrots and cucumber slices? They stay exactly where you put them. Even after two hours in the fridge. Even when you transport it across town in the car. Game changer. Completely and totally a game changer. I wasn’t sure it would actually work the first time I tried it, but now I’d never skip it for a party version.
A small offset spatula is really the right tool here. The angled blade lets you apply pressure evenly without dragging the surface. Worth having in your kitchen drawer if you don’t already.
Does Chilling the Salad Before Serving Actually Improve Shape
Yes. Full stop. Chilling is not optional. It’s the step that turns a wobbly dome into a confident, crisp hat that holds through an entire party.
Cold temperatures firm up the fats in your base filling (the mayo and yogurt), which essentially sets the structure. Think of it like gelatin: warm, it’s liquid; cold, it holds. The same basic principle applies here. I chill the molded base for a minimum of 45 minutes, and ideally overnight. The additional 30 minutes of chilling after final assembly, before serving, makes a real visible difference in how sharp and defined the silhouette looks.
My Accidental Discovery That Made This Salad Go Viral
So here’s the story. Last December, I was rushing to get ready for my neighbor’s holiday party and I ran out of my usual chicken salad filling halfway through packing the mold. I had about a cup of filling left to go, and all I had in the fridge was some leftover smoked salmon dip.
I just… used it. I packed the smoked salmon dip on top of the chicken salad inside the mold, thinking nobody would ever know. When I unmolded it, I realized it had created a beautiful two-toned cross-section when sliced. My friend Melissa posted a photo of the sliced version on her Instagram. It got 6,000 likes in a day. That’s how the two-layer hat shaped salad became my most requested recipe.
Why Layering From the Brim Up Changes Everything
Before that accidental discovery, I always built my salads top-down, garnishing the crown first and then adding the brim. It seemed logical. But the problem was that handling the salad to add the brim always disturbed the crown garnishes. Everything shifted.
Building from the brim upward, the way I do it now, means you establish your base and work toward the focal point. The crown goes on last, when the salad is already stable and sitting firmly on its brim. You have full access to every surface. Your hands aren’t hovering over delicate garnishes while you try to tuck lettuce underneath. The whole process is calmer and more controlled.
You know that feeling when the whole kitchen smells incredible and everything just comes together perfectly? That’s what this method feels like compared to the old way. It’s almost meditative.
How One Ingredient Swap Made the Best Hat Shaped Salad
The smoked salmon layer was the obvious star of that viral moment. But there was a second swap I made that day that I think actually matters more: I switched from regular mayo to whipped cream cheese as the outer binder on the crown surface.
Cream cheese holds color better. It doesn’t seep into the vegetables and make them look wet. And it has a slightly tangy flavor that works beautifully with the fresh vegetables pressed against it. It’s the best hat shaped salad version I’ve made, and it came entirely from a moment of last-minute panic.
The lesson I took from that whole experience is that your biggest kitchen accidents are often where your best recipes live. Don’t be afraid to improvise. The salad hat shaped just the way you need it to be when you trust your instincts and use what you have.
Yes! If you don’t have a round mixing bowl, a Bundt pan works for a ring shape, and a colander lined with plastic wrap gives a flatter dome. You can also use a springform pan for a more uniform cylinder shape. The mold just needs to be rigid, food-safe, and have sides high enough to support the filling while it chills.
The very first time I made this salad was for Léa’s sixth birthday party. I spent an hour and a half on it, followed a tutorial that left out half the important steps, and watched it slowly lean to one side during the party like a tipsy snowman. I served it anyway because what else are you going to do? The kids thought it was hilarious. My mother-in-law Evelyn very kindly said “it still tastes wonderful, Sarah.” That was seven years ago. I’ve made probably forty versions since then. Every single batch taught me something the one before didn’t. The recipe in this guide is the version I’d make if I only ever got to make it one more time: structured, beautiful, and actually reliable.
Hat Shaped Salad: Frequently Asked Questions
To make a Hat Shaped Salad, start by preparing a sturdy base filling like chicken salad, egg salad, or a chickpea mixture. Pack it firmly into a plastic-wrap-lined bowl and refrigerate for at least 45 minutes. Unmold the dome onto a large serving platter, then fan romaine lettuce leaves around the base to form the brim. Layer colorful vegetables from the brim upward, finishing with croutons or herbs at the crown peak. Drizzle with dressing just before serving for the best appearance and texture.
The best base is one that’s moist enough to bind but firm enough to hold a dome shape. Chicken salad with mayo and Greek yogurt is my top choice. Tuna salad, egg salad, and chickpea mixtures also work beautifully. Avoid using only loose greens, since they won’t hold the dome shape. Chill the base for at least 45 minutes before unmolding for best results.
Yes! The base filling can be made 1-2 days ahead. Chop vegetables up to 24 hours in advance and store them in separate airtight containers. Assemble the full salad 2-4 hours before serving, cover loosely with plastic wrap, and refrigerate. Add the dressing and any delicate garnishes only right before the salad hits the table. The greens will wilt if they sit too long, so timing the lettuce brim for 2 hours max before serving is ideal.
Active prep time is about 45 minutes, including making the base filling, chopping vegetables, molding, and final assembly. Add 45-60 minutes of passive chilling time for the crown to set. If you prep the filling the night before, day-of assembly can take as little as 20-25 minutes. Total elapsed time from start to table is typically 1.5 to 2 hours on the day of serving.
Choose colorful, sturdy vegetables that hold their crispness. Shredded carrots, halved cherry tomatoes, mini cucumber rounds, diced bell peppers, radishes, red onion rings, and hard-boiled eggs are all excellent. Use romaine or iceberg for the leafy brim since they hold up longer than soft lettuces. Avoid large chunks of watery tomatoes, which can make the base soggy. Layer different colors concentrically for the most visual impact.
Press the base filling firmly into the mold and refrigerate for at least 45-60 minutes before unmolding. Use a thin layer of softened cream cheese on the outside surface of the crown to grip vegetable garnishes. Build vegetable layers from the brim upward rather than from the top down. Apply dressing only at the last moment to prevent sogginess. And always, always chill your assembled salad for at least 30 minutes before serving for maximum structural integrity.
Wrapping Up: Your Hat Shaped Salad Adventure Starts Now
The Hat Shaped Salad is one of those dishes that looks like you spent your entire day in the kitchen, but actually comes together with very manageable effort once you understand the structure. And now you do. You know the base ratios, the vegetable layering sequence, the cream cheese binding trick, and the brim-first assembly method.
Whether you’re making this for a Thanksgiving table, a kids’ birthday, or just a Tuesday night when you want dinner to feel like a celebration, this salad delivers. Every single time. My family still gets genuinely excited when they see me pulling out the mixing bowl mold, because they know what’s coming.
Browse more delicious recipes at momtasty.com! And if you want to know more about the person behind these recipes, come visit my About Me page to read my full story. If you have questions, ideas, or just want to share how your version turned out, I’d love to hear from you on my Contact page.