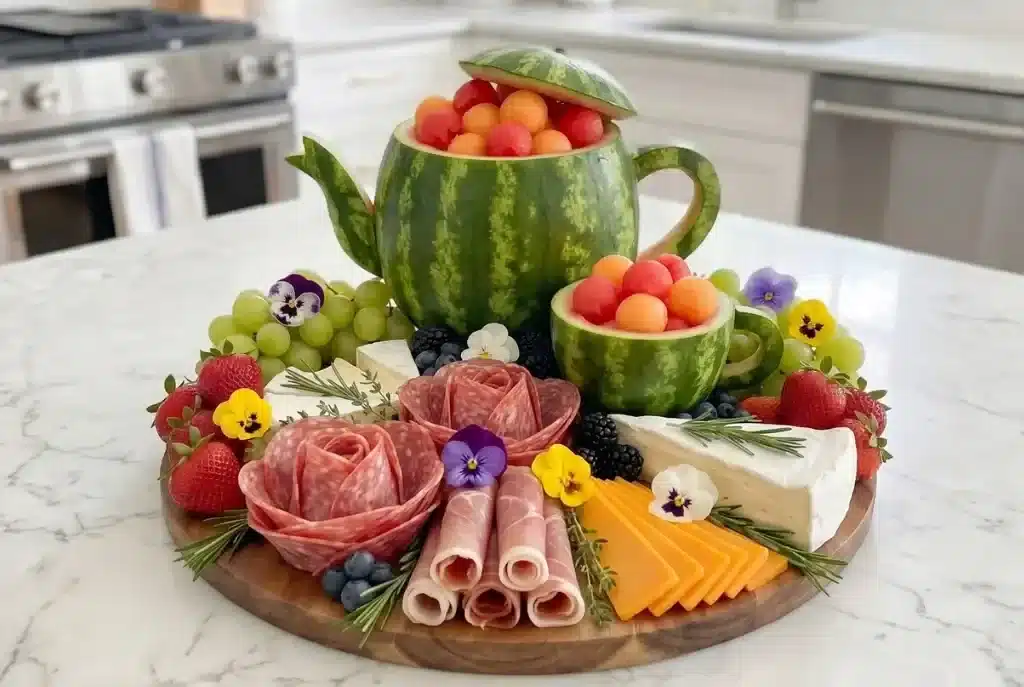
watermelon teapot carving is my go to trick when I need something that looks fancy but is secretly just fruit and a little patience. You know that moment when guests are coming and you realize your table looks kind of plain? Same. This is the edible centerpiece I make for garden parties, baby showers, and those sunny weekends when everyone wants something light and fun.
It’s a conversation starter, and people actually eat it instead of politely ignoring flowers. If you can slice a watermelon safely, you can totally do this.
The Ultimate Edible Centerpiece for Garden Parties
I started making edible centerpieces because I got tired of spending money on decorations that got tossed the next day. A fruit bowl that looks like a teapot feels playful and weirdly nostalgic, like a little tea party for grownups. Plus, it solves two problems at once: your table looks amazing and you’ve already got a healthy snack ready to go.
When I set this out, people hover. They ask how you did it, they take pictures, and then they start grabbing fruit. That is exactly what you want from a centerpiece. Also, if you’re hosting outside, fruit just feels right. Light, cold, juicy, and not too heavy.
Quick note before we get into it: take your time with the cuts, and keep a paper towel nearby because watermelon is basically delicious chaos.
If you love playful fruit displays, you’ll probably also enjoy this fun carved melon idea.

Choosing the Right Watermelon and Melons
This part matters more than people think. The better the watermelon, the easier it is to carve and the prettier the final shape looks. You want one that feels solid and steady, because it’s literally your teapot body.
My simple shopping checklist
- Shape: Look for a round or slightly oval watermelon that can sit flat without wobbling.
- Weight: Heavier usually means juicier.
- Field spot: A creamy yellow spot is a good sign it ripened on the ground.
- Rind: Skip ones with deep soft spots or cracks.
For the spout and handle, you can use extra watermelon pieces, but I actually like using other melons too. Cantaloupe and honeydfew are firmer in a different way, and they add color contrast. If your watermelon is super juicy and soft, a firmer melon handle can be easier to work with.
If you want more snack-board inspiration around this centerpiece, try these easy hosting ideas.
How to Hollow Out and Shape the Teapot Base
This is where it starts looking like a real watermelon teapot, and honestly it’s the most satisfying part. You’re basically turning the watermelon into a sturdy bowl with a lid vibe.
First, wash the outside. Even though you’re not eating the rind, your knife will drag germs inward if you skip this. Then dry it so it does not slide around.
Here’s the approach that keeps it simple:
1) Make a stable bottom. Slice a very thin piece off the bottom so it sits flat. Go slow. You only need enough to stop the wobble.
2) Cut the lid. Imagine the top third of the watermelon is your teapot lid. Cut a circle around the top and lift it off. If it’s stubborn, wiggle your knife gently instead of forcing it.
3) Hollow it out. Use a big spoon or a melon baller and scoop out the fruit. Save the best chunks for serving. I like to leave about 1 inch of thickness so the teapot stays strong and doesn’t collapse.
4) Smooth the rim. Clean up rough edges with small careful cuts. It does not need to be perfect, but a smoother rim helps later when you add the spout and handle.
If you’re nervous about carving, practice your first cuts on a cheaper melon. Or do what I did the first time: invite a friend over and call it a craft night.
Attaching the Spout and Handle Securely
This is the part everyone thinks is hard, but it’s mostly about stability. The trick is making contact points that are flat and using toothpicks like tiny support beams.
Spout: Cut a wedge shaped piece from watermelon rind with some red flesh still attached. Think of a chunky triangle that can stick out like a teapot spout. Trim the base of the spout so it’s flat where it meets the teapot body. Then press it gently against the side of the watermelon to see where it fits best. Once you like the placement, insert 2 to 4 toothpicks into the spout base, then push the whole thing into the teapot body.
Handle: For the handle, you can carve a curved strip from rind, or use a firm cantaloupe strip. I like a thicker handle because it looks cleaner and holds better. Again, trim both ends flat, then use toothpicks at both ends to secure it.
Two big tips from my own trial and error:
Tip 1: Don’t attach too close to the rim. Leave a little space so the lid can still sit on top.
Tip 2: If it feels wiggly, add another toothpick and stop touching it. The more you mess with it, the looser it gets.
Once it’s attached, step back and look at it from the front. If you like the silhouette, you’re good. If not, adjust now before it’s filled with fruit.
Carving the Matching Watermelon Teacup
A matching teacup is such a cute touch, and it doesn’t need to be big. You can make it from a mini watermelon, or just carve it from a thick section of your main melon if you bought a large one.
Quick method I use
1) Slice a thick round. Cut a 2 to 3 inch thick slice from a watermelon.
2) Shape the cup. Trim the outside into a round cup shape, then scoop out the center, leaving a thick wall.
3) Add a tiny handle. Cut a small curved piece of rind and attach with toothpicks.
Sometimes I fill the teacup with berries, sometimes I put a little yogurt dip in it.
Pairing Your Teapot with Charcuterie
This is where your edible centerpiece turns into the main event. I like to place the watermelon teapot fruit bowl in the center, then build a relaxed charcuterie board around it. Not the fussy kind with twenty ingredients. Just the kind people actually snack on.
Here’s what pairs really well with all that sweet fruit:
- Cheese: feta, goat cheese, or a mild brie
- Crunch: salted nuts, seeded crackers, or pretzel thins
- Salty bite: olives or prosciutto if you eat meat
- Extra sweetness: honey, fig jam, or dark chocolate pieces
I like to keep the fruit flavors in mind. Watermelon plus feta is classic. Watermelon plus salty nuts is also a win. And if kids are around, I lean heavier on berries, cubes of cheese, and crunchy crackers.
Put a small bowl nearby for toothpicks and little skewers. People love building their own bites, and it keeps the fruit bowl looking nicer longer.
Keeping Your Fruit Art Fresh Before Serving
Freshness is the difference between wow and meh, especially with watermelon. Luckily, you can do most of this ahead of time without stressing out.
My make ahead game plan
Up to 1 day ahead: Carve the teapot body, spout, handle, and cup. Wrap everything tightly in plastic wrap and store in the fridge. Keep the lid wrapped too.
Up to 6 hours ahead: Cut your fruit for filling. Store it in sealed containers with a paper towel in the bottom to catch extra moisture.
Right before guests arrive: Assemble and fill. This keeps everything crisp and photo ready.
A few practical tips that save you:
Drain juicy fruit. Pineapple and strawberries can leak. Let them sit in a strainer for a minute before adding them.
Keep it cold. If it’s hot out, set the teapot on a tray over ice packs hidden under a towel.
Don’t overfill. If you mound fruit too high, it spills when people scoop.
If your party is outside, I also recommend putting out a smaller refill bowl from the fridge and topping up as needed. Your centerpiece stays prettier and your fruit stays safer.
Common Questions
Can I make the watermelon teapot fruit bowl the night before?
Yes. Carve the pieces, wrap tightly, and refrigerate. Wait to fill it with fruit until closer to serving so it doesn’t get watery.
What if my spout or handle won’t stay on?
Use thicker pieces and add more toothpicks. Also make sure the contact points are flat so they grip instead of sliding.
Do I need special carving tools?
No. A sharp chef’s knife, a small paring knife, a spoon, and toothpicks are enough. A melon baller is nice but not required.
How do I keep the cut watermelon from drying out?
Plastic wrap and cold storage. If you notice dry edges, a quick gentle trim with a knife makes it look fresh again.
Is this safe to leave out during a party?
I try to keep cut fruit out for no more than 2 hours at room temp, less if it’s very hot outside. Keep a refill bowl chilled and swap if needed.
A Sweet Finish for Your Party Table
If you try this, don’t worry about making it perfect. The fun of a watermelon teapot fruit bowl is that it looks impressive even when it’s a little quirky, and it tastes great no matter what. After you do it once, you’ll get faster, and you’ll start seeing new ways to shape the spout and handle.
If you want a little extra visual inspiration, this Teapot – Watermelon Board guide is a helpful reference to keep open while you carve. Now grab a ripe melon, take a deep breath, and go make your own watermelon teapot fruit bowl for the next get together.

Watermelon Teapot Fruit Bowl
Ingredients
For the teapot
- 1 large watermelon Choose a solid, round or oval watermelon.
- 1 small mini watermelon or extra watermelon pieces For the matching teacup.
- 1 cantaloupe or honeydew For the spout and handle.
- 2-4 toothpicks For securing the spout and handle.
For filling
- 2 cups mixed berries For the teacup.
- 1 cup feta cheese Pairs well with watermelon.
- 1 cup salty nuts For added crunch.
- 0.5 cup honey or fig jam For sweetness.
Instructions
Preparation
- Wash and dry the outside of the watermelon.
- Slice a thin piece off the bottom of the watermelon to make a stable base.
- Cut a circle around the top third of the watermelon to create the lid.
- Hollow out the watermelon using a big spoon or melon baller, leaving about an inch of thickness.
- Smooth the rim with careful cuts to prepare for the spout and handle.
Assembly
- For the spout, carve a wedge from the watermelon rind and secure it with toothpicks.
- For the handle, use a curved strip from rind or cantaloupe and secure it with toothpicks.
- Make sure the lid fits well and adjust if necessary.
Teacup
- Cut a thick slice from the mini watermelon or a section of the main melon.
- Shape it into a round cup and hollow it out, leaving a thick wall.
- Add a tiny handle and secure it with toothpicks.