Written by Sarah Miller
Ever found yourself craving something sweet but also wanting to keep it on the healthier side? You’re not alone! Many of us struggle to find desserts that are both indulgent and wholesome. That’s where matcha brownies come in—a perfect blend of rich, fudgy goodness and the vibrant, earthy flavor of matcha. First, imagine biting into a soft, chewy brownie with a unique twist. Next, picture how easy it is to whip up this treat in your own kitchen. You’re going to love this recipe because it’s simple, fun, and packed with the antioxidant benefits of matcha.
In addition to being delicious, these brownies are incredibly versatile. Whether you’re baking for a party, a cozy night in, or just because, they’re sure to impress. Then, there’s the bonus of how customizable they are—add nuts, swirl in some white chocolate, or keep them classic. It’s like a fun little challenge to make them your own! So, grab your apron and get ready to dive into the world of matcha brownies. Trust me, your taste buds will thank you!
The Origins and Popularity of Matcha in Baking
A Brief History of Matcha and Its Culinary Uses
Matcha has been around for centuries, starting in Japan. It was first used in tea ceremonies. Over time, people began using it in cooking. Today, matcha is a popular ingredient in desserts. Its vibrant green color and unique flavor make it stand out. You can find it in everything from lattes to ice cream. Matcha brownies are a delicious way to enjoy this ingredient. They combine the rich taste of chocolate with the earthy notes of matcha. This mix creates a treat that’s both familiar and exciting.
Why Matcha Brownies Are a Modern Dessert Favorite
Matcha brownies have become a favorite for many reasons. First, they offer a unique twist on a classic dessert. Next, they’re packed with antioxidants, making them a healthier option. Also, their bright green color makes them Instagram-worthy. Here’s a quick table to show why they’re so popular:
| Reason | Why It’s Loved |
|---|---|
| Unique Flavor | Combines earthy matcha with sweet chocolate |
| Health Benefits | High in antioxidants |
| Visual Appeal | Vibrant green color stands out |
| Easy to Make | Simple recipe for beginners |
You’re going to love how fun and tasty these brownies are!
Crafting the Perfect Matcha Brownie Batter
Balancing Matcha’s Bitterness with Sweetness
Matcha has a slightly bitter taste, but don’t worry! You can balance it with sweetness. First, use high-quality matcha powder. Next, add just the right amount of sugar. Then, mix in some vanilla extract for extra flavor. This combo creates a perfect harmony. The bitterness of matcha pairs well with the sweetness of the brownie. It’s like a fun little challenge to get the balance just right.
Tips for Achieving the Ideal Brownie Texture
Getting the perfect texture for your matcha brownies is easy. Follow these tips:
- Use melted butter for a fudgy feel.
- Don’t overmix the batter; keep it slightly lumpy.
- Bake at 325°F for a gooey center.
- Let them cool before cutting for clean slices.
These steps will give you brownies that are soft, chewy, and absolutely delicious.
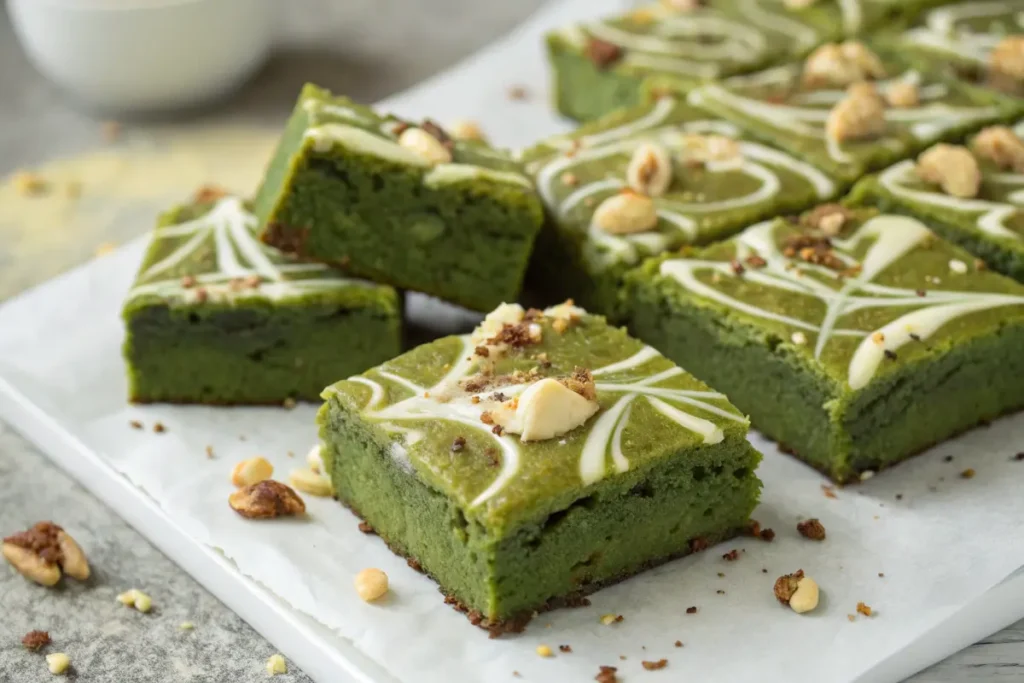
Creative Variations of Matcha Brownies
Adding Nuts and Seeds for Extra Crunch
Want to add some crunch to your matcha brownies? Try nuts or seeds! First, walnuts or almonds work great. Next, sprinkle in some chia or sunflower seeds. These add a nice texture and make the brownies more filling. You can even mix and match to create your own version. It’s like building a sandwich, but much quicker!
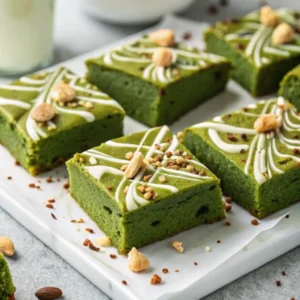
Swirling in White Chocolate for a Flavor Twist
For a fun twist, swirl in some white chocolate. Here’s how:
- Melt white chocolate and drizzle it over the batter.
- Use a toothpick to create swirls.
- Bake as usual for a marbled effect.
This adds a creamy, sweet contrast to the earthy matcha. You’re going to love this combo!
Baking and Storing Matcha Brownies Like a Pro
The Ideal Baking Time and Temperature for Gooey Brownies
To get gooey matcha brownies, bake them at 325°F for 20-25 minutes. Check with a toothpick; it should come out slightly sticky. Overbaking can make them dry. Keep an eye on them, and you’ll have perfect brownies every time.
How to Store and Keep Your Brownies Fresh Longer
Keep your brownies fresh with these tips:
- Store them in an airtight container.
- Place parchment paper between layers to prevent sticking.
- Keep them at room temperature for up to 3 days.
- For longer storage, freeze them in a sealed bag.
These steps ensure your brownies stay soft and delicious.
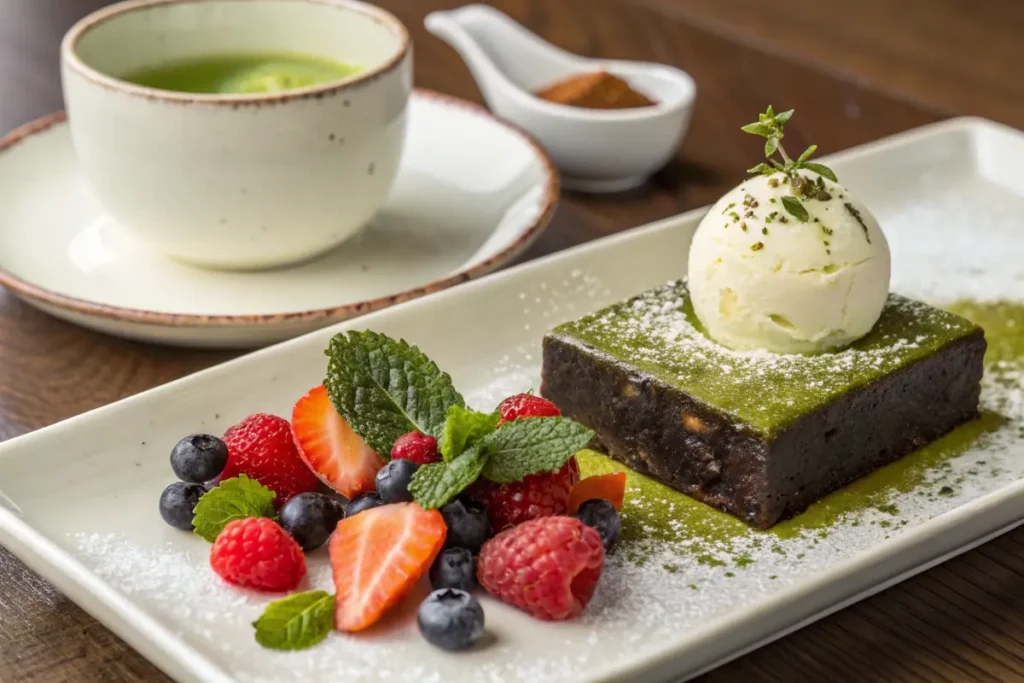
Pairing and Serving Matcha Brownies for Maximum Enjoyment
Best Beverages to Complement Matcha Brownies
Matcha brownies pair well with many drinks. Try these:
- Green tea for a double matcha boost.
- Milk for a classic combo.
- Coffee to balance the sweetness.
These pairings make your dessert even more enjoyable.
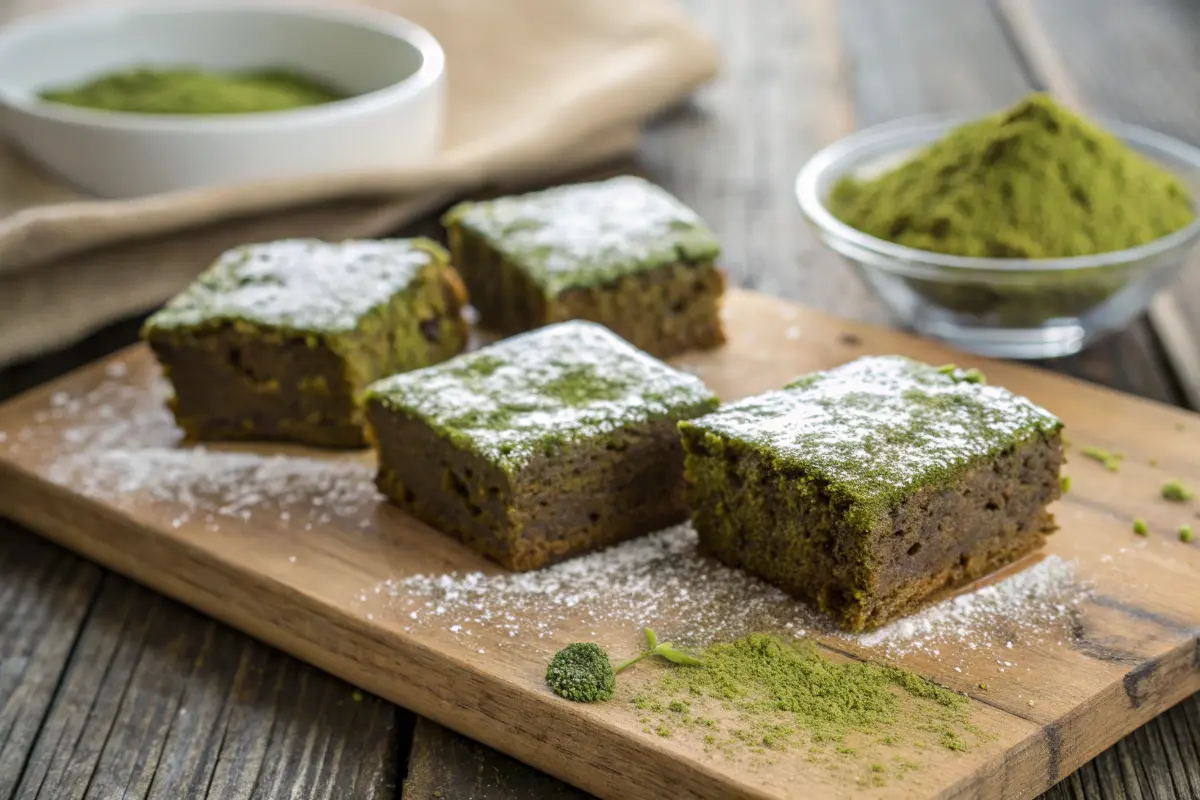
Creative Presentation Ideas for Special Occasions
Make your matcha brownies stand out with these ideas:
- Dust with powdered sugar for a snowy effect.
- Add fresh berries on top for a pop of color.
- Serve on a wooden board for a rustic look.
These touches make your brownies perfect for any occasion.
Savor the Green Goodness: Your Matcha Brownie Journey Starts Here!
Ready to take your love for matcha to the next level? Let’s whip up something irresistibly delicious—Matcha Coconut Bliss Bites! These little bites are like a tropical vacation for your taste buds, combining the earthy charm of matcha with the sweet, creamy magic of coconut. Grab your apron, and let’s get started—it’s easier than you think!
Matcha Coconut Bliss Bites
Ingredients
Let’s gather the ingredients for these delightful Matcha Coconut Bliss Bites! First, we’ll need matcha powder—this vibrant green superstar adds earthy flavor and a boost of antioxidants. Next, grab some shredded coconut for a tropical twist and chewy texture. Then, almond flour steps in to keep these bites gluten-free and nutty. Also, don’t forget honey—it’s the natural sweetener that binds everything together. Finally, a splash of vanilla extract adds a warm, comforting aroma.
Here’s the full list:
- Matcha powder – 2 tsp (for that earthy, vibrant kick).
- Shredded coconut – 1 cup (adds tropical flavor and chewiness).
- Almond flour – 1 cup (keeps it gluten-free and nutty).
- Honey – ¼ cup (natural sweetness and binding power).
- Vanilla extract – 1 tsp (for a cozy, aromatic touch).
Step-by-Step Instructions
Ready to make these blissful bites? Let’s dive in!
- Mix the dry ingredients – First, combine matcha powder, shredded coconut, and almond flour in a bowl. This creates the base of your bites.
- Add the wet ingredients – Next, pour in honey and vanilla extract. Then, mix until everything sticks together like dough.
- Shape the bites – Scoop small portions and roll them into balls. Also, you can flatten them slightly for a cookie-like shape.
- Chill to set – Place the bites on a tray and refrigerate for 20 minutes. This helps them firm up.
- Serve and enjoy – Finally, take them out and enjoy your matcha coconut bliss bites!
Serving
These bites are perfect for snacking or dessert! First, serve them on a pretty plate for a pop of color. Next, pair them with a cup of green tea for a double matcha treat. Also, try sprinkling extra shredded coconut on top for a fun garnish. For a party, arrange them on a platter with fresh berries.
Tips and Hacks
Want to make these bites even better? Here are some tips:
- Toast the coconut – First, lightly toast shredded coconut for extra flavor.
- Add nuts – Next, mix in chopped almonds or cashews for crunch.
- Swap sweeteners – Use maple syrup instead of honey for a vegan option.
- Store smart – Keep them in an airtight container for up to a week.
Nutrition Facts
Serving size: 1 bite (makes about 12 bites)
Calories: 90
Fat: 5g
Carbs: 9g
Protein: 2g
Sodium: 5mg
Fiber: 1g
Please note: Nutrition facts are estimates and may vary based on ingredient brands and portion sizes.
Prep Time
Prep time: 10 minutes
Chill time: 20 minutes
Total time: 30 minutes
Prep time may vary slightly depending on your rolling speed!
What to Serve with Matcha Coconut Bliss Bites
Here are some delicious pairings to enjoy with your Matcha Coconut Bliss Bites! These recipes from my website will complement the earthy, tropical flavors perfectly:
- Cinnamon Sugar French Toast Muffins – Sweet, fluffy muffins that add a cozy breakfast vibe.
- Protein Pudding – A creamy, high-protein treat to balance the sweetness.
- Cinnamon Applesauce – A light, spiced side that pairs wonderfully with matcha.
- Carrot Juice Recipe – A fresh, vibrant drink to refresh your palate.
These options are easy to make and perfect for any occasion. Enjoy! 😊
Frequently Asked Questions (FAQs)
What does matcha do in baking?
Matcha adds a unique flavor and color to baked goods. First, it brings an earthy, slightly bitter taste that balances sweetness. Next, its vibrant green color makes desserts like matcha brownies stand out. Also, matcha is packed with antioxidants, making treats a bit healthier. It’s like a secret ingredient that makes baking more fun and exciting!
Do matcha and chocolate go together?
Yes, matcha and chocolate are a dream team! First, matcha’s earthy flavor pairs perfectly with chocolate’s sweetness. Next, the combo creates a rich, balanced taste in treats like matcha brownies. Also, the green and brown colors look amazing together. You’re going to love how these flavors work together—it’s a match made in dessert heaven!
Why are my matcha brownies brown?
Your matcha brownies might turn brown if the matcha oxidizes or bakes too long. First, high heat can dull matcha’s vibrant green color. Next, mixing it with cocoa or chocolate can also change the shade. Also, using less matcha powder might make them browner. Don’t worry—they’ll still taste delicious, even if they’re not bright green!
Savor the Green Goodness: Your Matcha Brownie Journey Starts Here
Ready to dive into the world of matcha brownies? First, these treats are a perfect mix of rich chocolate and earthy matcha. Next, they’re easy to make and fun to customize. Also, they’re packed with antioxidants, making them a healthier dessert option. You’re going to love how simple and delicious they are!
Then, don’t forget to try creative twists like adding nuts or white chocolate. It’s like a fun little challenge to make them your own. Finally, share them with friends or enjoy them as a sweet solo treat. Your matcha brownie adventure is just beginning—let’s get baking!
Related Recipes and Articles
Continue Your Culinary Journey
- Southern Cornbread Recipe – A classic side to try.
- Weight Watchers Cabbage Soup – A healthy, flavorful dish.
- Slow Cooker Garlic Parmesan Chicken – A savory main course.
Delicious Recipes Await
- Baked Cottage Cheese – A creamy, low-calorie dish.
- Spinach with Boiled Eggs – A simple, nutritious meal.
- Chicken Broccoli Rice Casserole – A comforting family favorite.
More Inspiration for You
- Artisan Italian Bread Guide – Learn to bake like a pro.
- Cottage Cheese Flatbread Recipe – A quick, healthy snack.
- Tomahawk Steak Guide – Master the art of grilling.
Related Cooking Tips and Recipes
- How to Make Conch Salad – A zesty, island-inspired dish.
- Beefy 5-Layer Burrito – Flavor-packed perfection.
- Crab Brulee Recipe – A unique, indulgent treat.
Matcha Brownies
Equipment
- Mixing Bowls: One medium and one large for combining wet and dry ingredients.
- Whisk: For mixing the ingredients smoothly.
- Spatula: To fold the batter gently.
- 8×8-inch Baking Pan: For baking the brownies.
- Parchment Paper: To line the baking pan for easy removal.
- Measuring Cups and Spoons: For accurate measurements of ingredients.
- Oven: Preheated to 325°F (165°C).
- Toothpick: For testing doneness.
Ingredients
- 1 cup all-purpose flour
- 1 tbsp matcha powder high-quality for vibrant color and flavor
- ½ tsp baking powder
- ¼ tsp salt
- ½ cup unsalted butter melted
- ¾ cup granulated sugar
- 2 large eggs
- 1 tsp vanilla extract
- ½ cup white chocolate chips optional for added sweetness
Instructions
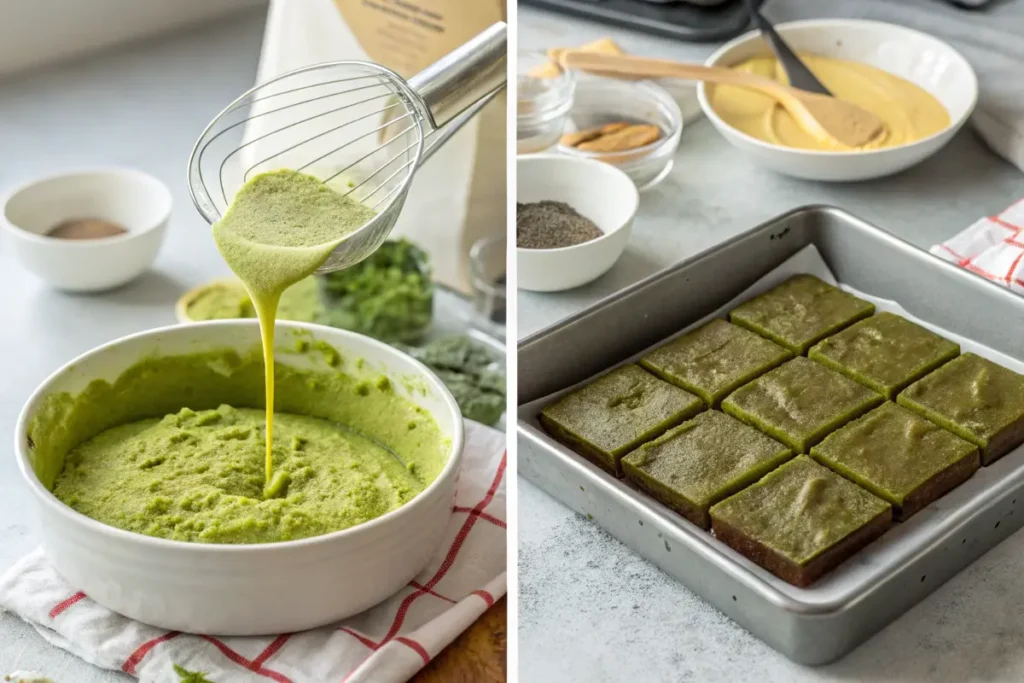
- Preheat Oven: Preheat your oven to 325°F (165°C). Line an 8×8-inch baking pan with parchment paper or lightly grease it.
- Mix Dry Ingredients: In a medium bowl, whisk together the flour, matcha powder, baking powder, and salt. Set aside.
- Combine Wet Ingredients: In a separate bowl, whisk the melted butter and sugar until smooth. Add the eggs one at a time, followed by the vanilla extract, mixing until fully incorporated.
- Create Batter: Gradually fold the dry ingredients into the wet ingredients, mixing until just combined. Do not overmix. Gently fold in white chocolate chips if using.
- Pour and Bake: Pour the batter into the prepared baking pan, spreading it evenly. Bake for 20–25 minutes, or until a toothpick inserted into the center comes out with a few moist crumbs.
- Cool and Serve: Let the brownies cool completely in the pan before slicing into squares. Enjoy!
Notes
Store in an airtight container at room temperature for up to 3 days, or freeze for longer storage.
Toasted nuts or a drizzle of dark chocolate can be added for extra texture and flavor