If you want a sweet snack that feels rich, fun, and very easy to love, this chocolate wafer truffle recipe is a great choice. It has a soft center, a crunchy chocolate shell, and a nutty finish that makes each bite feel special. If you like easy no-bake treats, you may also enjoy crunchy tiramisu bites, which give the same kind of small-bite dessert joy.
These truffles work well for parties, family snacks, holidays, or a simple sweet treat at home. They look fancy, but they use basic ingredients and simple steps. You do not need an oven, and you do not need hard skills. You only need a bowl, your hands, and a little time.
Why Make This Recipe
This recipe is a smart choice when you want a dessert that is fast, rich, and easy to share. The wafers make the inside light and crumbly. The Nutella and hazelnut spread make the middle smooth and creamy. The chocolate coating adds a strong chocolate taste and a nice snap. The chopped hazelnuts add extra crunch and make the truffles taste even better.
It is also a good recipe for beginners. You do not need to bake anything. You do not need special tools. You can make the filling, shape the balls, coat them, and chill them. That is all. Because the steps are simple, this recipe is a good one to make with kids or with friends.
Another good thing is that you can change the look and taste in easy ways. You can roll the truffles in nuts, cocoa powder, or crushed biscuits. You can use different chocolate on the outside. You can also make them small for a party tray or a little bigger for a richer treat. For more fun bite-size ideas, brie and turkey bites show how small snacks can still feel special and nice to serve.
How to Make Chocolate Wafer Truffles
Making these truffles is simple and quick. First, crush the vanilla wafers into fine crumbs. You can do this in a food processor or by putting them in a bag and pressing them with a rolling pin. The crumbs should be fine so the balls hold together well.
Next, mix the wafer crumbs with Nutella. Stir until the mixture becomes thick and sticky. Then take small portions and roll them into balls with your hands. Try to make each one about the same size so they look even.
After that, make a small hole in the center of each ball and fill it with chocolate hazelnut spread. Close the hole and reshape the ball so the filling stays inside. Smooth the outside with your hands.
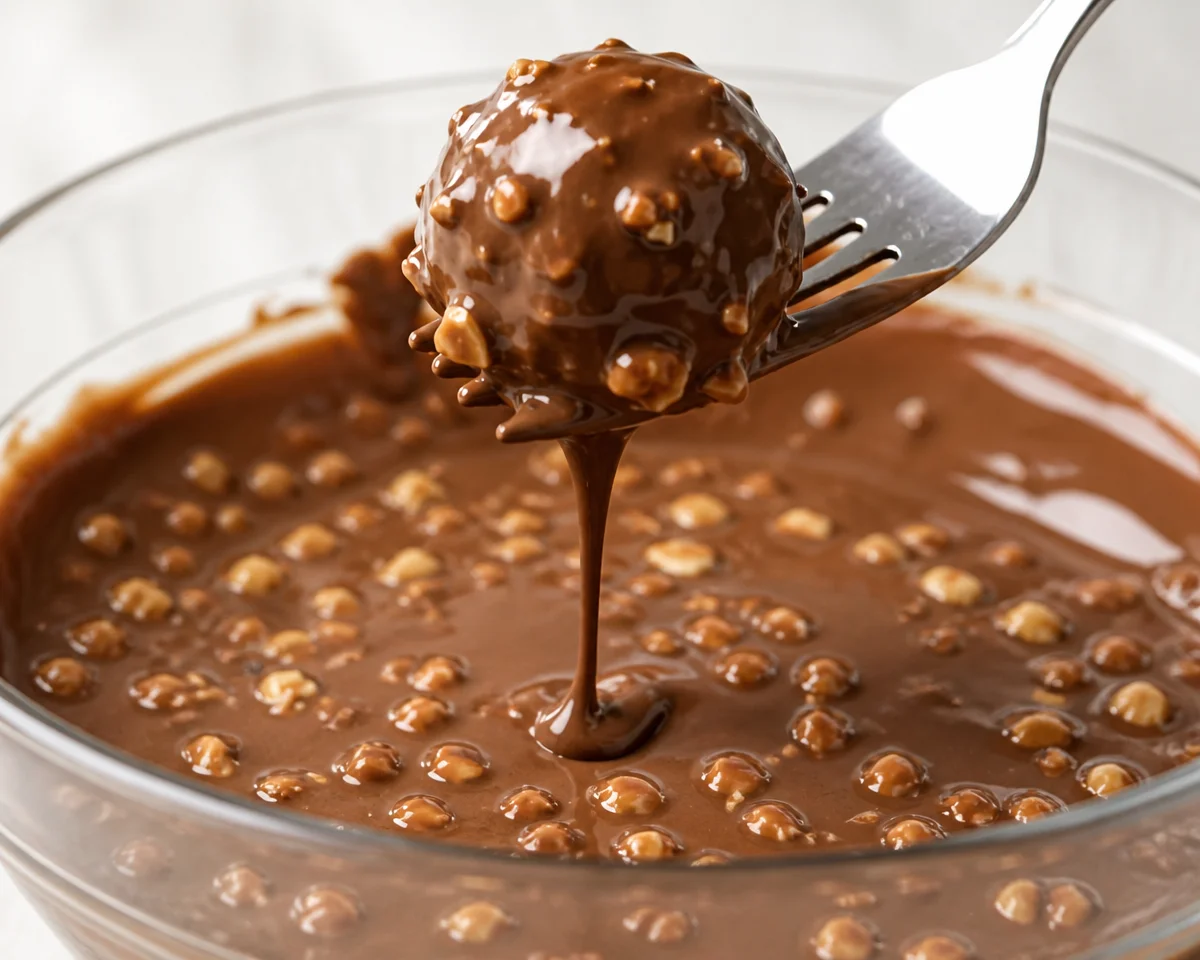
Then melt the milk chocolate. Mix in the chopped roasted hazelnuts so the coating has texture and crunch. Dip each ball into the chocolate mix until fully covered. Lift it out and let the extra chocolate drip off. Place the truffles on a tray lined with parchment paper.
Finally, let them set until the chocolate becomes firm. You can chill them in the fridge to help them set faster. After that, they are ready to serve.
Ingredients
- 200g vanilla wafer biscuits
- 150g Nutella
- 100g chocolate hazelnut spread for filling
- 200g milk chocolate
- 80g roasted chopped hazelnuts
Directions
- Crush the wafers into fine crumbs.
- Mix the crumbs with Nutella until the mixture is thick and smooth enough to roll.
- Roll the mixture into small balls.
- Make a small hole in each ball and fill it with chocolate hazelnut spread.
- Seal the hole and reshape the balls into smooth rounds.
- Melt the milk chocolate.
- Mix the chopped hazelnuts into the melted chocolate.
- Dip each ball into the chocolate until fully coated.
- Place the truffles on parchment paper.
- Let them set until firm.
- Serve and enjoy.
How to Serve Chocolate Wafer Truffles
You can serve these truffles in many simple ways. Put them on a plate as a sweet snack after dinner. Add them to a dessert tray with fruit, cookies, or small cakes. They also work well for birthdays, tea time, or holiday tables.
If you want a more polished look, place each truffle in a small paper cup. This helps them look neat and makes them easy to pick up. You can also dust the serving plate with a little cocoa powder or add a few whole hazelnuts around the truffles for decoration.
These truffles taste great with coffee, tea, milk, or hot chocolate. Because they are rich, small servings are often enough. One or two truffles can satisfy a sweet craving very well.
How to Store Chocolate Wafer Truffles
Store the truffles in an airtight container. Keep them in the fridge if your room is warm or if you want the chocolate shell to stay firm. They usually stay fresh for several days when stored well.
If you stack them, place parchment paper between the layers so they do not stick together. Let them sit for a few minutes at room temperature before serving if they are very cold. This can help the center taste softer and creamier.
You can also freeze them, but the texture may change a little after thawing. If you freeze them, place them in a sealed container and thaw them in the fridge before serving.
Tips to Make Chocolate Wafer Truffles
Use fine wafer crumbs. Large pieces can make the mixture hard to shape.
Do not add too much filling at once. A small amount is enough to give a creamy center without making the ball too soft.
If the mixture feels too soft, chill it for a short time before rolling. This makes shaping much easier.
When you melt the chocolate, stir it gently so it stays smooth. If the chocolate gets too hot, it may become thick or grainy.
Work fast when dipping the balls. If the chocolate starts to set, warm it a little again.
Use roasted hazelnuts for better flavor. The roasted taste gives the truffles a deeper nutty note.
Chill the finished truffles before serving. This helps the coating set well and makes them easier to eat.
Variation
You can make this recipe in many simple ways.
Use dark chocolate instead of milk chocolate if you want a stronger cocoa taste.
Roll the truffles in cocoa powder, crushed hazelnuts, or crushed biscuits instead of dipping them in chocolate.
Add a small pinch of salt to the filling if you want a sweet-salty taste.
Use different spreads for the center, like peanut spread or a cookie spread, if you want to try a new flavor.
You can also make mini truffles for a party tray or larger ones for a more filling dessert.
FAQs
Can I make these truffles without an oven?
Yes, you can. This is a no-bake recipe, so you do not need to turn on the oven at all.
Can I use a different type of biscuit?
Yes. You can use other plain sweet biscuits if you do not have vanilla wafers. Just make sure they crush well and have a mild flavor.
Why is my mixture too soft?
If the mixture is too soft, it may have too much spread or not enough crumbs. Add a little more crushed wafer and chill the mixture before shaping.
Can I make these ahead of time?
Yes. These truffles are a good make-ahead treat. You can prepare them earlier in the day or even the day before you plan to serve them.
Do I have to use hazelnuts?
No. The hazelnuts add crunch and flavor, but you can leave them out or use another nut if you like.
Conclusion
These chocolate wafer truffles are a simple, rich, and fun dessert that you can make with easy steps and basic ingredients. They have a creamy center, a crisp chocolate shell, and a lovely nutty crunch, so they feel special without much work. For more inspiration on sweet treats, you can explore this reference file on Hugging Face and also browse elegant dessert ideas on Lemon8.
Chocolate Wafer Truffles
Ingredients
Main Ingredients
- 200 g vanilla wafer biscuits Crushed into fine crumbs
- 150 g Nutella For mixing
- 100 g chocolate hazelnut spread For filling
- 200 g milk chocolate For coating, melted
- 80 g roasted chopped hazelnuts For texture in chocolate coating
Instructions
Preparation
- Crush the wafers into fine crumbs.
- Mix the crumbs with Nutella until the mixture is thick and smooth enough to roll.
- Roll the mixture into small balls.
- Make a small hole in each ball and fill it with chocolate hazelnut spread.
- Seal the hole and reshape the balls into smooth rounds.
- Melt the milk chocolate and mix in the chopped hazelnuts.
- Dip each ball into the chocolate until fully coated.
- Place the truffles on parchment paper and let them set until firm.