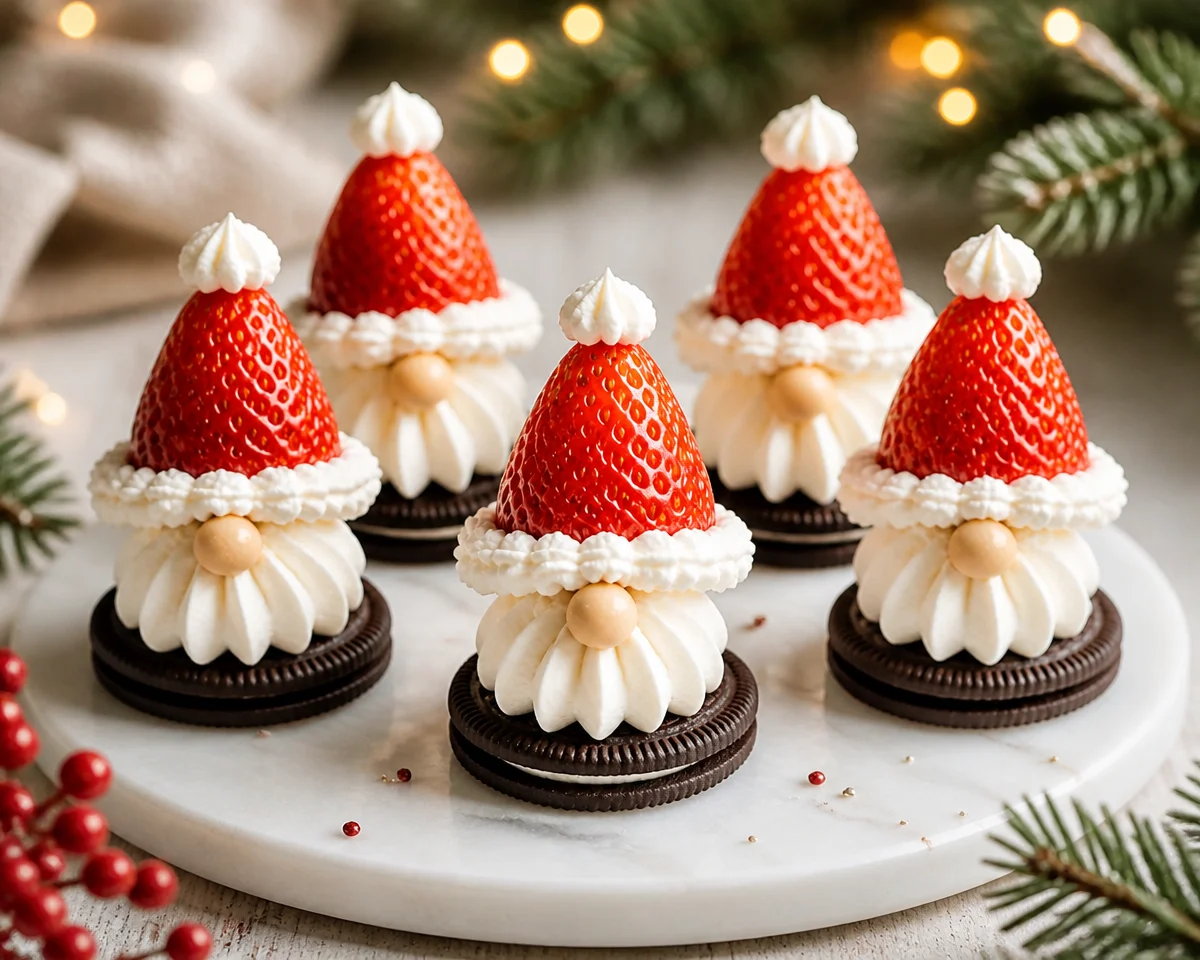
Strawberry Santa Gnome Treats bring a little Christmas fun to your dessert table with fresh berries, fluffy whipped cream, and chocolate sandwich cookies. Each small treat has a red strawberry hat, a white cream trim, and a tiny nose. The crushed cookie base adds a sweet chocolate crunch.
These no-bake Christmas desserts work well for family gatherings, holiday snack plates, and simple kitchen projects with kids. You do not need an oven or special decorating tools. A spoon, a small knife, and a serving tray will help you get started.
If you enjoy using fresh fruit as part of your table display, a pineapple and strawberry centerpiece can add more color beside these little gnomes. Keep the treats chilled until serving time so the cream stays firm and the berries stay fresh.
Why Make This Recipe
These Strawberry Santa Gnome Treats turn a short ingredient list into a cheerful holiday dessert. The red berries and white cream give them a Christmas look without much work.
Here are a few reasons to try them:
- No baking needed: You can leave the oven free for other holiday food.
- Simple ingredients: Strawberries, whipped cream, and chocolate sandwich cookies make up the main recipe.
- Easy to adjust: Make a small plate for your family or a larger tray for a party.
- Fun to decorate: Each gnome can have its own shape and little nose.
- A mix of flavors: Fresh fruit balances the sweet cream and chocolate cookies.
Kids can help crush the cookies, spoon the crumbs into small cups, and add cream. An adult should wash and cut the berries. The finished gnomes do not need to look perfect. Slight differences make them look playful and homemade.
How to Make Strawberry Santa Gnome Treats
Start by setting out your serving tray or small dessert cups. Since crushed cookies form a loose base, shallow cups or small dessert dishes make the gnomes easier to serve. Guests can eat the berries, cream, and crumbs together with a spoon.
Choose firm strawberries with pointed ends. Once you remove the leafy tops, the wide cut ends will sit on the cookie base while the pointed ends face up like little hats.
The recipe below uses suggested amounts for about 12 treats. The exact amount of cream and cookies may change with the size of your strawberries.
Ingredients
- 12 juicy red strawberries, plus 1 or 2 extra berries for the noses
- About 1 cup fluffy whipped cream, chilled and firm enough to hold its shape
- About 12 chocolate sandwich cookies, crushed
You can use homemade whipped cream or a prepared whipped topping that holds its shape. If you use cream from a spray can, assemble the treats close to serving time because it may soften quickly.
Small pieces of strawberry make easy noses without adding another ingredient. You can use a small candy instead, but choose a size and texture that suit your guests.
Directions
-
Wash and dry the strawberries. Rinse the berries under cool running water. Pat them dry with a clean towel, paying close attention to the area around the leaves. Cream will slide more easily on wet fruit.
-
Remove the leafy tops. Cut straight across the wide end of each strawberry to remove the leaves and make a flat bottom. Keep the pointed end whole to form the top of the hat.
-
Prepare the cookie base. Put the chocolate sandwich cookies in a food-safe bag and crush them with a rolling pin. Leave some small crumbs for texture, but avoid large chunks that could make the berries lean.
-
Arrange the crumbs. Divide the crushed cookies among 12 small dessert cups or dishes. Press the crumbs lightly with the back of a spoon. They will stay loose rather than form a firm crust.
-
Set the strawberries in place. Stand one strawberry on each cookie base with its flat side down and its point facing up. Gently nestle it into the crumbs.
-
Add the whipped cream. Spoon or pipe a small dollop onto the pointed top of each strawberry for the hat’s fluff. Add a short band of cream around the lower front edge to form the hat trim and a small beard.
-
Add the noses. Cut tiny pieces from the extra strawberries. Press one piece into the cream at the front of each gnome, just below the hat trim. If you use candy noses, place them in the same spot.
-
Chill until serving. Place the finished treats in the refrigerator briefly while you finish setting the table. Serve soon after assembly for the best shape and crunch.
How to Serve Strawberry Santa Gnome Treats
Serve these treats cold in small clear cups or shallow dessert dishes. Clear cups show off the dark cookie layer and help keep the loose crumbs in one place. Add a small spoon beside each serving.
For a shared platter, make separate small piles of cookie crumbs and leave space between the gnomes. Use a small serving spoon to lift each treat with some of its base. Keep in mind that this version works better as a spoon dessert than as a finger food.
These sweet bites also fit into a larger Christmas snack table. Pair them with a festive Santa cheese board to give guests both sweet and savory choices.
Set out a small batch at a time and keep the rest in the refrigerator. Refill the serving tray as needed rather than leaving every treat out for the full gathering.
How to Store Strawberry Santa Gnome Treats
Store assembled gnomes in a covered container in the refrigerator at 40°F or below. Choose a tall container so the lid does not touch the whipped cream. Keep the treats in a single layer.
These treats taste and look best on the day you make them. Over time, the strawberries release moisture, the cream softens, and the cookie crumbs lose their crunch. If you have leftovers, refrigerate them promptly and aim to eat them within 24 hours for the best quality.
Do not leave the treats at room temperature for more than two hours, or more than one hour when the temperature is above 90°F.
For easier prep, crush the cookies ahead of time and keep them in an airtight container at room temperature. Store the washed, fully dried strawberries separately in the refrigerator. Add the cream and build the gnomes shortly before serving.
Freezing is not a good choice for the finished treats. Thawed berries soften and release liquid, which can spoil the shape and soak the crumbs.
Tips to Make Strawberry Santa Gnome Treats
- Pick firm berries. Soft or bruised strawberries will not hold their shape as well.
- Dry the fruit well. Surface water can thin the cream and make decorations slip.
- Make a flat bottom. A straight cut helps each strawberry stand upright.
- Keep the cream cold. Take it out of the refrigerator only when you are ready to decorate.
- Use small noses. Heavy pieces of fruit or candy can pull away from the cream.
- Avoid too much cream. A small amount gives the gnomes their shape without hiding the red hats.
- Use a simple piping bag. Spoon the cream into a food-safe bag and snip off one small corner for better control.
- Build one test gnome first. This helps you decide how much cream and how many crumbs each serving needs.
If a strawberry keeps tipping, use a slightly deeper cup and nestle its base farther into the crumbs. Do not expect the loose cookie layer to hold together like a baked crust.
Variations
You can make small changes while keeping the same basic strawberry gnome shape.
Use different sandwich cookies. Vanilla sandwich cookies create a lighter base, while mint chocolate cookies add a holiday flavor. Check the package if you need to avoid certain ingredients.
Make a larger beard. Pipe a little extra cream down the front of the strawberry beneath the nose. Leave most of the red berry showing so it still looks like a hat.
Try a dairy-free topping. Use a firm dairy-free whipped topping and check the cookie label too. Keep the topping cold and test one gnome before making the full batch.
Use mini serving cups. Smaller strawberries and smaller portions of crumbs make little dessert cups for a table with several sweets.
Keep the noses fruit-only. Tiny strawberry pieces keep the recipe simple and avoid the need for candy decorations.
FAQs
Can I make Strawberry Santa Gnome Treats the night before?
You can prepare the parts the night before, but assemble them closer to serving time. Keep the crumbs dry, refrigerate the strawberries, and store the cream separately. Fully assembled treats may soften overnight.
Can I use frozen strawberries?
Fresh strawberries work best. Frozen berries release water as they thaw and often become too soft to stand upright. Use firm fresh berries for clear hat shapes.
Do I need a piping bag?
No. A small spoon works for the cream dollops. For finer control, use a food-safe bag with a tiny corner cut off. Start with a small opening because you can always make it larger.
Why does the whipped cream slide off?
The strawberries may still be wet, or the cream may be too soft. Dry the berries fully and use cold cream that holds its shape. Add small amounts instead of one heavy dollop.
Can I make these without candy?
Yes. Use a tiny piece of strawberry for each nose. The main recipe needs only strawberries, whipped cream, and chocolate sandwich cookies.
Are these treats easy to carry to a party?
Yes, especially in individual cups. Place the cups in a snug, covered tray and keep them cold during transport with a cooler and ice packs. Refrigerate them when you arrive.
Conclusion
Strawberry Santa Gnome Treats offer a simple way to add fresh fruit and holiday fun to your dessert table. Dry the berries well, keep the cream cold, and assemble the treats near serving time for the best results.
For another gnome-shaped dessert, explore the OREO no-bake cheesecake gnomes from Snackworks. If you prefer a chocolate dessert base, the easy brownie bite gnomes from It’s Always Autumn offer another festive idea for your holiday spread.